
Other Posts in This Series
- Introduction
- Graphics
- Physics (You’re here!)
- Collision Detection
- Computer AI
- Screen Transitions
- Postmortem
A Gameboy Physics Engine
Last time, we talked about how the Gameboy renders the graphics for Pocket League. Turns out, it’s very complicated, but it’s only part of making a fun game.
If you’ve played Rocket League, you’ll know that it’s very fun to flip around the arena, bounce off walls, boost, and just drive in general. My goal for Pocket League was to try to capture the essence of the game and bring it to the Gameboy – obviously there are things missing, but I feel like Pocket League grasps the essentials. Enter Pocket League’s physics engine.
In order for it to work, we need to simulate:
- Driving acceleration
- Gravity (jumping, boosting, balls falling)
- Bouncing
- Collisions between car and ball
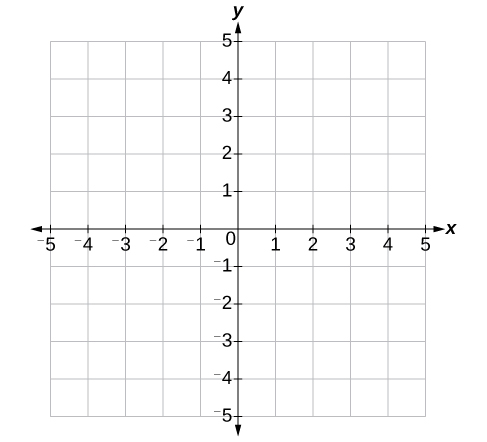
The Coordinate System
From elementary school you may recall the coordinate plane below where the origin of the plane is (0, 0). Anything to the left of the origin is negative in the X axis and anything below the origin is negative in the Y axis:
The Gameboy, however, uses the following coordinate plane for its screen, where the X value is between 0 and 144 and the Y value is between 0 and 160 (ignoring scrolling the window, as Pocket League doesn’t use). Note that the Y value is increasing as we move lower in the plane. This will be helpful to refer to when looking at where objects are positioned on screen:
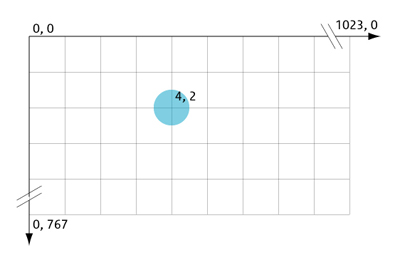
(Ignore the obvious screen dimension discrepancy. I’m lazy.)
Let’s Jump (Pun Intended) Right In!
Straight to the code. Let’s set up the basic constants.
// These are boundaries for the car
#define FLOOR               140u
#define CEILING             24u

// How fast the game runs. I wanted this to be tweakable as it grew more complex.
#define GAME_SPEED          3 // Higher is slower

// The ball sits a little lower than the car sprite.
#define BALL_FLOOR          136u

// Define the boundaries of the arena (for the car and the ball)
#define ARENA_X_MIN         16
#define ARENA_X_MAX         144

// Define the goal X and Y (so the ball can go in instead of bouncing)
#define GOAL_Y_MIN          53
#define GOAL_Y_MAX          83

// The fun stuff.
#define GRAVITY             1  // How fast things accelerate downward
#define JUMP_ACCELERATION   10 // How high to jump
#define ACCELERATION        1  // How fast things accelerate when driving
#define ROTATION_SPEED      15 // How fast the car rotates (we covered this in Part 1)
#define BOOST_ACCELERATION  1  // How fast the boost accelerates the car
#define GOAL_EXPL_VELOCITY  15 // Wheeee!

// More constants here, they'll be introduced as needed
Nice. If you’ve played with physics engines before this stuff’ll look (fairly) standard.
Moving Cars
Let’s start out by talking about the cars’ movement. In general, it’s more straightforward than the ball’s movement since they don’t bounce, but the same concepts will apply there as well. We’ll start by initializing a player car at the constant start position, set it’s acceleration in both the X (plr_d_x) and Y (plr_d_y) axis to zero, and set it’s rotation to zero.
  INT8 plr_d_x = 0;
  INT8 plr_d_y = 0;

  UINT8 plr_rot = 0;

  UINT8 plr_x_pos = CAR_1_START_X;
  UINT8 plr_y_pos = CAR_1_START_y;

  // See Part 1 for how this works
  move_car_sprite(plr_x_pos, plr_y_pos, plr_rot);
Now we’re ready to move!
Driving
Driving left and right is actually very straightforward. We simply read the joypad (code omitted), and check if it’s right or left on the D-Pad (GBDK calls these J_RIGHT and J_LEFT). If either of these are true, on each tick we can simply increment the plr_d_x by the ACCELERATION constant. If the D-Pad is released, the car needs to gradually slow instead. There’s a useful function called tick_car_physics that gets called on each game tick for each car in order to perform these calculations:
// Takes the car #, the X and Y position, the acceleration in X and Y, rotation, and the current and previous inputs
void tick_car_physics(UINT8 n, UINT8 *x, UINT8 *y, INT8 *d_x, INT8 *d_y, UINT8 *rot, UINT8 input1, UINT8 input2) {
  /*
    First we need to make sure the car's on the ground, otherwise this will behave strangely.
    It's not super important now, but when we can jump, this should be checked
  */
  if (*y == FLOOR) {
    // Rotate to 0, so the car's wheels are down.
    *rot = 0;

    // Move right
    if (input1 & J_RIGHT)  {
      *d_x += ACCELERATION;
    }
    // Move left
    else if (input1 & J_LEFT) {
      *d_x -= ACCELERATION;
    }
    // Otherwise SLOW the car down
    else if (!(input1 & J_B)) {

      // If the sign of d_x changes (i.e. we subtract ACCELERATION from d_x causing it to go negative),
      // then the car should be completely stopped instead (d_x == 0).

      if (*d_x > 0) {
        *d_x -= ACCELERATION;

        if (*d_x <= 0) {
          *d_x = 0;
        }
      }

      if (*d_x < 0) {
        *d_x += ACCELERATION;

        if (*d_x >= 0) {
          *d_x = 0;
        }
      }
    }
  }
  // Otherwise, it's in the air, so rotate the car
  else {
    // A bunch of code that performs increments to the *rot* parameter based on D-Pad input
  }
}
The ball physics work in much the same way. Note that in the full Rocket League game, the ball will never slow down unless it touches the floor or a wall. Unfortunately, implementing this functionality in Pocket League caused the game to be unplayable as the arena is so small, the ball would bounce around forever.
Jumping
Now that basic movement is out of the way, jumping and gravity simulation will look very similar. Essentially, jumping introduces a large negative acceleration (-JUMP_ACCELERATION) to the d_y value of the car, and then is incremented by GRAVITY on every tick. And the same for the ball:
// From within tick_car_physics()

  // Jump -- Note debounced_input() is a helper function to prevent holding down the A button from continually jumping.
  if (debounced_input(J_A, input1, input2) && *y == FLOOR) {
    *d_y = -JUMP_ACCELERATION;
  }

  // If it's already on the floor, the Y acceleration is zero
  if (*y >= FLOOR) {
    *y = FLOOR;
    *d_y = 0;
  }
  // Otherwise, it's falling
  else if (*y < FLOOR) {
    *d_y += GRAVITY;
  }
Boosting
Also very simple – check the car’s rotation quadrant (refresher: rot / 32), and determine whether to increment the X or Y acceleration and in what direction:
  // x_mod and y_mod are in the set (-1, 0, 1)
  *d_x += BOOST_ACCELERATION * x_mod;
  *d_y += BOOST_ACCELERATION * y_mod;
Staying Within the Boundaries
We can essentially clamp the car’s X and Y position to the ARENA_X_MAX, ARENA_X_MIN, CEILING, and FLOOR values. If we encounter one, we make sure the car doesn’t move past the boundary and set the relevant acceleration to 0:
  if (*x >= ARENA_X_MAX) {
    *x = ARENA_X_MAX;
    *d_x = 0;
  }
  else if (*x <= ARENA_X_MIN) {
    *x = ARENA_X_MIN;
    *d_x = 0;
  }

  if (*y >= FLOOR) {
    *y = FLOOR;
    *d_y = 0;
  }
  else if (*y < FLOOR) {
    *d_y += GRAVITY;
  }

  if (*y < CEILING) {
    *y = CEILING;
    *d_y = 0;
  }
The Ball
The ball follows almost exactly the same pattern as the car physics – it has its own tick_ball_physics function that is called on every game tick. However, unlike the cars, it can bounce off walls.
Instead of simply setting the acceleration to zero, like in the car, we multiply it by -1 to get the inverse.
  if (*ball_x_pos > ARENA_X_MAX) {
    *ball_x_pos = ARENA_X_MAX;
    *ball_d_x *= -1;
  }
  else if (*ball_x_pos < ARENA_X_MIN) {
    *ball_x_pos = ARENA_X_MIN;
    *ball_d_x *= -1;
  }
This effectively bounces the ball off the wall! The same happens for the ceiling and floor as well; I omitted the code since it’s so similar.}
Overflows and Underflows
There is a slight bug with the ball code above. You may have noticed that the X and Y position of the cars are of UINT8 type. This is an unsigned 8 bit integer, which, as we discussed before with rot, can take the values between 0 and 255.
If you’ve played Rocket League, you’ll know that “pinching” the ball between two cars can shoot the ball out at high velocities. Pocket League is no different.
If, for instance, a ball is moving LEFT (so the d_x velocity is highly negative) and the ball’s X position is very low, it’s possible that the ball_x_pos + ball_d_x results in a number that is LESS than 0. When this happens, the value underflows to 255 and the ball will “wrap around” the screen, causing all sorts of havoc.
To prevent this, there’s a check in place to make sure that adding a highly negative number doesn’t result in a higher number (i.e. an underflow). The same check is applied for the right side of the screen, but isn’t as important as moving a sprite to an X coordinate greater than the width of the screen isn’t necessarily undesired – in fact the window can “scroll” a la Mario, it’s just not desired for this game. Notice all the space to the right, and none to the left:
This will look very similar to the code to cause bouncing (because it’s the same! Just some different conditions.):
  if (abs(*ball_d_x) >= *ball_x_pos && *ball_d_x < 0) {
    *ball_x_pos = ARENA_X_MIN;
    *ball_d_x *= -1;
  }
  else if (*ball_d_x + *ball_x_pos > 255) {
    *ball_x_pos = ARENA_X_MAX;
    *ball_d_x *= -1;
  }
Next Time: Collisions
All in all, this makes for a very boring game. After all, we have simulated physics at this point, but there’s no collisions, and thus, no way for the cars to interact with the ball!
Next time, we’ll dig into collision detection and how car hitboxes were created that closely match the rotation of each car. From there, we’ll finally have a semi-playable game!
Thanks for reading!
- ← Previous: Writing a Gameboy Game in 2021: Part 1 -- Graphics
- Next: Writing a Gameboy Game in 2021: Part 3 -- Collision Detection →